
Showing posts with label artwork. Show all posts
Showing posts with label artwork. Show all posts
Monday, April 10, 2017
Tuesday, November 15, 2016
Body Works: Five Senses (DivineBrick in collab. w/ Wes Johansen and Z.Vital)
Whereas watching Izella Berman with Jean Paul Jenkins and Mitchell Brown

Whereas


DivineBrick in collab. w/ Wes Johansen and Z.Vital
game experience in three parts (grey 3)
Viewer this is your part of this game. A simple description to still allow the experience to be new.
Part one
When invited to the Chamber feel welcome to come along. The space you hold sacred around you will be respected, all that is asked from you is to exist at a moment with another force other than yourself. You are free to leave at anytime, until another is chosen. We are mirrors to each other.
Part two
Come closer to the figure(s) that move under the light. Come see this moment as a landscape in which you hover over. See yourself in these/ this figure(s) as floating world(s), only now able to see the pale blue delicate soup that you are. Harmony easily broken with any influence dropped in. Decipher your roots.
Part Three
Five with frogs follow the figure(s), the rest follow the five. Five lead us all to the next experience when this ones complete.


Photos by Andrew Hall
Friday, November 4, 2016
Raze the WhiteBox- DivineBrick in Collab. w/ Mike Meanstreetz and Z.Vital @ Human Resources, Chinatown, LA, Ca
Raze the WhiteBox from Eon Mora on Vimeo.
Raze the WhiteBox
DivineBrick in Collaboration with Mike Meanstreetz and Z.Vital @ Human Resources, Chinatown, LA May 10, 2016
Video By Eon Mora
www.razethewhitebox.com
Click on Title of Vid to Enlarge
Sunday, May 1, 2016
Proposal For Human Resources LA Decolonize LA
Proposal for “Raze the WhiteBox”
To raze the WhiteBox will be a symbolic action of a greater deconstruction. Working within models of colonization will only develop concepts consumed by colonizing behaviors. Dismantling of this gallery space would be the only method to decolonizing it.
The WhiteBox (any gallery or museum space that hermetically isolates artwork) in its design and conception will always contain/own an object or thought. Property and borders are red flags of colonization. Dismantling a structure which is designed to contain objects and thoughts within 6 sides would be the action to decolonize it. Cement is not fertile ground, it is dead inactive space. A public space that allows community, inspiration and creativity does not exclusively exist as a collection or claim to ownership as does a museum or gallery. Community, inspiration, and creativity by their very nature will always remain fluid and un-owned. These three concepts only empower when used by the collective mass. The process of decolonizing spaces will involve replacing structures in which people collectively perform these concepts.
The remaining land, once this WhiteBox is dismantled, should be a network in which Peoples (any groups that have internalized a colonialist ideology) can regain a culture, but also regain what mother nature once offered in its harsh but nurturing way. The colonization of a People resulted at times with a simultaneous colonization of the land as well. Returning the land to its state of natural symbiosis will plant the seed of change that is necessary for this wounded earth to remember its role and for us to see its glory. This demolition is the only holistic therapy/ cathartic ritual that will remember the many forgotten People, forgotten knowledge, and resources that the colonizers either stole or destroyed. A WhiteBox and its confining walls symbolically and literally censor the past and the land onto which it has rooted itself.
The demolition will be followed by the introduction of indigenous plants and animals. This will inhabit the majority of the land and be integrated in whatever else is built. Some land will remain for agriculture and a stage/ gathering area for community and artist use. In the decolonization of this WhiteBox we must not forget about the inheritors of the colonized state of mind, the children. A place in which children could learn how to engage with nature and relearn the art of symbiosis would replace the structures that now exist on 410 Cottage Home St. If any structures will be built, they will remain small, since the land itself should provide a stage or setting for most things. Monetary means are intangible compared to community action and the blood and sweat of artist and activist. The land will be kept by its users.
If life is art how can life exist in a vacuum? Can the only definition of what art is be contained within a closet, which doors are only opened by someone with the means to own this space? Art removed from life, suffocated in a crate... Is this inspiration? Is art an object free from worldly interaction? Is it a phenomenon sheltered by the very thing that causes its chain-reaction? Transporting artwork produces waste, does this ill benefit this earth? Is a space built like a fortress a structure that welcomes the collective mass?
The brick unit is the beginning of growth. The straight lines imprisons the dirt, the self, the ripple of effect. - Raze the WhiteBox: A Think Tank of Change
May 1, 2016
Monday, August 31, 2015
The Sun Bear (three legs and a rail) ep4
Relatives,
I have been seeking a way, a form, a complete practice in which to exercise actions and thoughts that coincide with larger actions and thoughts that would allow behavioral growth. Understanding the mechanics and behaviors of this growth was also of interest. I seek a way to understand while I am actively changing the space in a way single to me, but part of a universal whole in which I am trying to understand. Causing shifts which rearrange enough to comprehend anew, but not losing the string that pulls me to the center. This is my present lesson. That seems the most human to me or the human I seek to be. A searcher of unknowable truths. A believer in forgotten mistakes.
Destruction is just a small aspect of rebuilding. When rebuilding, my mind thinks, this is when drive must be channeled. Fire does not need direction, everywhere is its path.
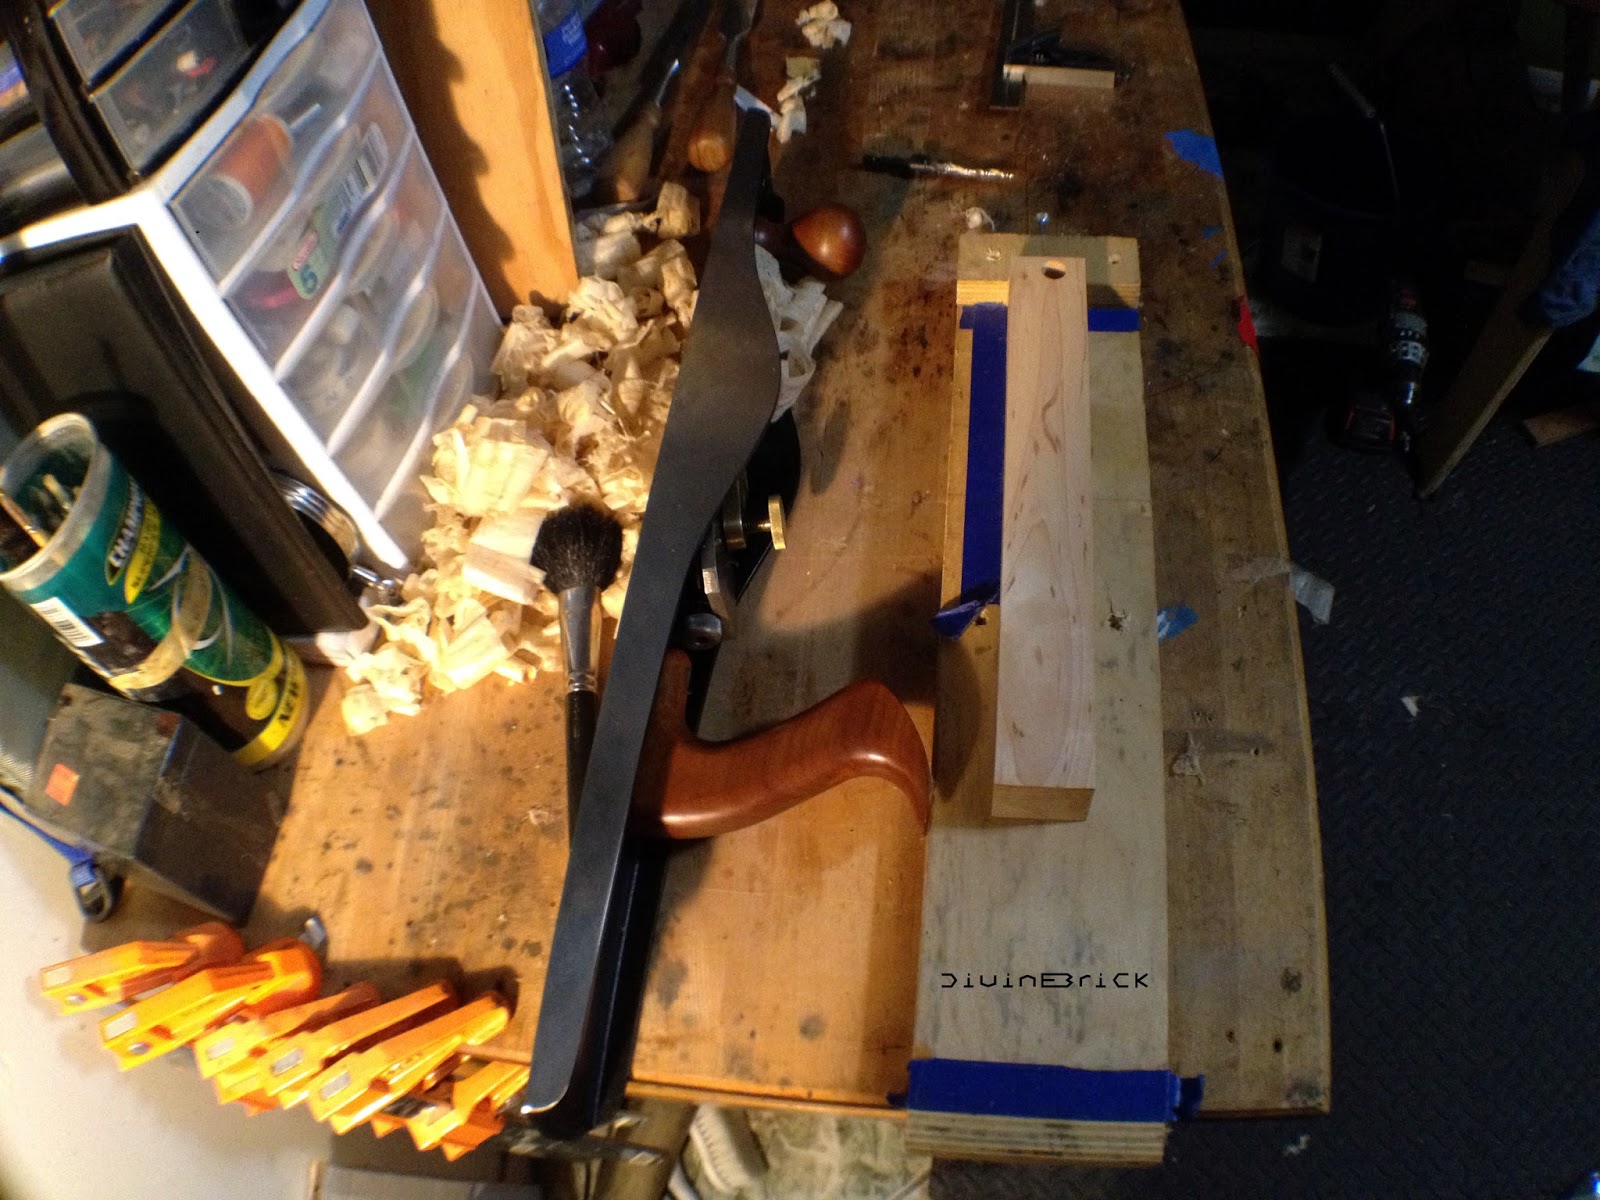
The most literal understanding of what I mean when I say all those vague concepts I chirp all the time, my only straight forward and simple representation and lesson is my work bench. Beauty do to function and simplicity. Growth enabled by necessity and a giants fall.
 |
| standing in the woodshop of csulb (wood major department) |
I needed a bench to work on. I had the wood. The know how I fumbled through. Each mistake reset with the only skill I did have, the only one we all have, to ride the wave on which we travel skirting on the right angle just enough to continue forward, finding aesthetics in falling upward a spiral step. To move is chaos. To have continuous movement seems to be the harder drive, the more deliberate tendency.
This work bench maybe a certain kind of perpetual. Either perpetually in my life time or the Sun Bears.
To catch up on the previous post:
post 1 http://dbrp.blogspot.de/2011/07/sun-bear-my-roubo-workbench.html
post 2 http://dbrp.blogspot.de/2012/11/the-sun-bear-jig-and-router_19.html
post 3 http://dbrp.blogspot.ru/2015/06/the-sun-bear-lifes-future.html
 |
| old tenons removed but not smoothed |
My Bench is up to working condition but let me show you how I re-arrived there. The last I spoke of the Sun Bear I was speaking of the maple plug planed and ready for the next lamination. Since I cut off the old tenons of the third leg I was left with less material for the tail of the sliding dovetail. The dovetail that would replace the failed fox joint that originally held the third leg in place. The walnut addition allow me to have the material to make the socket and tail of the sliding dovetail and hit my target height. It's an ad-hoc aesthetic that I found both silly and harshly contrasting. Which I enjoy.
Figuring the height was a bit forgiving. If my measurements of this moving bench were off I would simply have to flatten out the top to correct the angle that would be off. Of course even though this top has moved drastically it at one point started true. This is still prevalent in the left side of the bench. The area between the two twin dovetails of the first two legs were pretty square, some movement. Those were the strongest of the joints in the work bench. From there it went from bad to worse...but more about that in the next post. Saving me a noodle ache when flatting the top I made sure my estimates were true.
 |
| first two walnut pieces |
I glued it in the same multi-step method as the maple.

 |
| must have gotten too excited this is the only picture of this stage. But you get the idea. |
 |
| dried and flat |
When all the smoothing was done the beauty of the walnut really revealed itself. It has a gorgeous curl in the grain. Can't remember where this walnut came from. Possibly arts school. My feet have a great view of it when I work. That's if they look up.
 |
| smoothed and ready for the table saw top of third leg on which the dovetail will be cut |
Most often the table saw is a highly accurate tool, only if your reference for the cut starts from a square point.
The portions of the third leg that were once square were: the foot, the potion of the slab (slab dims 2 x 16 3/8 x 27 1/4h in.) that enters the foot (foot dims 23 x 3.5x 3.5h in.), the portion of the slab that enters the top of the bench. As I did when I first built the bench I picked a squarish side, made it more square, then made everything in the general proximity of the parts that would be riding on the table saw square. Square from there, opposite side as well.
I did a survey of all the planes and angles of the legs and top and figured which way to fudge and how much. A very intuitive approach. Once I made sure the sides of the leg were parallel I finished removing the remaining buds that were the failed fox joint tenons. The narrow side remained with the natural edge. Setting the saw to an angle I decided...I just went on how much I needed to angle based on the density and brittleness of the wood (to much of an angle I risk failure on the pointy parts of the dovetail), then I went ahead and made the first pair of cuts down the length riding on the narrow side at the top.
 |
| first two cuts done on the tail |
I honestly don't remember what I used to cut the length of the cut. I think I chiseled some of it then cut the rest with my hand saw. You can see it in the picture.


At certain points in my general making, I still seem to hit mental blockade. A now too uncomfortably familiar paralyzing unwelcomed friend. I sometimes think it is a natural instinct to protect the self. Or maybe it's a crossed wire on a feedback loop.
For me, my personal experience, my demise waits patiently behind hesitation. The only problem in knowing this is knowing how to temper my willingness to jump. This willingness has pushed my psyche, my flesh self, my general growth. I realize this has also cause unwanted effect. One example is this next step.
I thoroughly measured this next cut. The groove for the sliding dovetail. I decided to use a circular saw to help me make the recess. My first cut went perfect. down the center. Stopping short of going through the whole of the newly replaced underside of the bench (I thought it would look neat if the third leg looked like it got shot out and embedded into the top). The second one was just as well, angle true.
The other side of the angled groove, this cut is where I saw myself going out of the marked line. I had a chance to stop. I just continued. I'm not sure if I continued out of impatience or just for the challenge to fix another mistake. Even though the whole time it felt purposeful, I regretted the cut as soon as I ended it.
This inconvenience left me with a slightly wide groove towards the stop in the cut. A stopped reverse tapered sliding dovetail.
 |
| first cut down the middle |
 | |||
| cut stopped short (used one of my winding sticks for the fence) |
 |
| another view |
Guess by this time I was too preoccupied with measuring to take more pictures.
 |
| groove cut and cleaned |
I chopped the rest of the groove and cleaned it out with the chisel.

 |
| the third leg placed (also compensated for the very slight wind in the leg, that's why it looks at an angle) |
The fit was good enough to require a couple of shims.
 |
| I added dowels to secure the lamination (I put few just to see if the need to expand and contracted could be curved) |


 |
| maple and ficus shims |
 |
| added some copper nails |
To not forget this mistake I made sure I could see those shims.
 |
| third leg and rail secured |
Setting these shims was the last step to make the Sun Bear able to stand.

After forcing a few more shims here and there to really lock in the legs (these were tiny compared to the other ones) I was content to start the flatting of the bench.
I remember when I last thought of retrofitting this failed fox joint. A blue moon ago I started the work. Because of lack of equipment, interest in other arts, and the influence of corporate work that lots of artist feel must me done to be feed, this project had been in slumber. In need of making is the catalyst that revived it.
Next post on the Sun Bear will be about it's flatting and clamping additions.
Sunday, June 28, 2015
The Sun Bear (Roubo Inspired Workbench) ep3
The Sun Bear
(continuation of the retrofit)

Followers,
It has been quite a while since I have posted about The Sun Bear, a Roubo inspired workbench. My obsession with it has kept me in the studio more than may be healthy in the last few months. Joking of course. The studio practice is a beautiful yet sometimes isolating, an unsaid reality...sometimes. A project that started...I actually don't remember the birth of the Sun Bear...this is evidence of my neglect, of a beautiful time in my life, and the realization that I will present with this process of rebuilding. A realization that becomes more solidified as I work on this beast.
*if you are familiar with the past post on this project please continue on. if you wish to read these first click on these
post1
http://dbrp.blogspot.de/2011/07/sun-bear-my-roubo-workbench.html
post 2
http://dbrp.blogspot.de/2012/11/the-sun-bear-jig-and-router_19.html
Looking back on my notes it is hard to pin point the birth to 2007,...possibly 2006 in thought. I know I had it early in 2008. A year full of fear, love, and memories that are now intimately connected to my art. Looking back on my notes I found that at times I failed to date my thoughts. Also failed at writing more than I had wished. ..but that feeling forever never satisfied.
Flipping through my thoughts I found a picture which explained the obvious haze. Until now I see, that picture was dated 2002 a thought only to fruit in 2006. A picture of the moment I first saw a dream manifest in an institutional hallway of school. Of course my attention at this time was divided among my divine idealistic muse (my Art Belief) and this earthly dark angel in the picture. While tracing back and reflecting on my work and my notes its hard not to re-examaine myself. Only now a welcoming feeling.
My Bench reflects time spent adjusting and rebuilding self and ideals, simultaneously. A map of growth. A continually living being. If you recall I last left the Sun Bear bottom flatten ready for the maple glue up.
 | |
| ok ok I know the pics I will show look posed but I actually work pretty organized now |
 |
 |
| I hope to catch the good light that sometimes happens in my shop |
 |
| Tales from the Notebook |
I had a few ideas of how to rebuild this fox joint that went awry. I thought many over but finally settled on this method that includes a lot of intuition and impatience thrown in. Experiencing still some immaturity.
Just like my Undergrad professor Fred Rose, I see myself as a wood explore. I must remember each piece of wood came from a whole. A living Whole.
 | |
| trying to get out of the habit of putting the plane on its side |
I chose to use reclaimed maple from a work table top which I acquired from the science department of CSULB, continuing the legacy of this Long Beach resident that once was this bench. While I attended Cal State, the university decided to remodel and throw out lots of amazing specimens of the yester years of science. Microbiology being their new emphasis.
After ripping sticks 11 1/4 x 1 1/2 x 1 1/2, with my new table saw...*clears throat*...fuckin aye finally... I left some with the original table top varnish, I dry fitted the pieces.
Before I glued in the maple I glued in the walnut I decided to use to fill in the grooves I talked about in the previous post. A quick second to spend sometime talking about which way to glue the maple...with the grain of the iron bark or against. Since these woods most likely have different moisture content and rate of expansion. I was torn on what to do. I am not very versed in wood characteristics, (doubt much exists on iron bark) I kinda just went with my best judgement. Since the laminated piece will be spanning past the bench top both the top and lamented piece will expand and contract width wise individually with no real risk of tearing each other apart. Wood expands longitudinally insignificant amounts so their should be little to no risk...at least fixable risk.


Presently I have a limited amount of clamps. Which added to this adhoc method to measure the structure of instability. With the understand of what is the final failing point one can reel back and find the maximum efficiency. Sounds a bit militant industrial now speaking it, but it is a method that I have come to used when dealing with unknown answers to hard art problems. You can never have too many claps.

My approach hinged on the limit of my clamps. I think I glued 2-3 sticks at a time.


I had a lil fun with minimal clamping. Hopefully within tolerance.


 | |
| You can see the old tenons of the fox joint of the third leg in the back left. |


Once dried I leveled out the maple replacement. Too be clear this is the bottom of the bench where the third leg belongs. Some of the pieces are just free floating. I need to still reenforce these with dowels. Nicely accenting it. If you look closely at the picture above you can see by this time I cut off the old tenons of the fox joint on the leg. I work on many things at once mostly if the projects require breaks. The maple is now ready for the next layer of wood I decided to add... more on that later
I will continue on the next post with the final glue up and problems dealing with an un-square object plus the start of the sliding dovetail I decided to go with for the retrofit of the fox joint. until next time
deciphering the roots-
DBL
Subscribe to:
Posts (Atom)
